An apology to visitors who are in search for Chinese silk embroidery classes. We have stopped the silk embroidery course and have no plan when to resume.
Stitches of Suzhou Silk Embroidery
Authored by Sun Peilan
Just as writing is a fundamental aspect of calligraphy, stitching forms the core of embroidery. Calligraphy involves the art of handwriting, meticulously executed on paper using brush and ink. It consists of various strokes like the dot, horizontal stroke, vertical stroke, left-falling stroke, and right-falling stroke. Similarly, embroidery is a form of needlework where various stitches are meticulously applied to a base material.
Each stitch has its own unique rules and imparts a distinct effect to the final piece. For instance, the catch stitch, also known as the back stitch, is commonly employed in plain embroideries. This technique involves using plain or flat stitches on two or more layers of fabric, with the stitches connecting the marks on these layers.
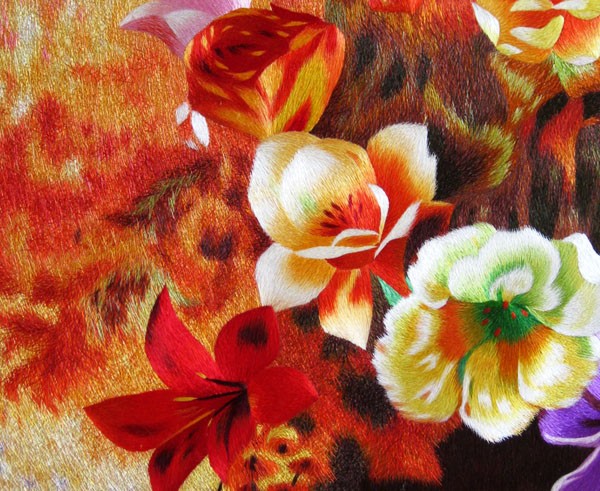
Different stitches give rise to various compositional effects, contributing to the individuality of each embroidery piece. For example, catch stitch embroidery displays clear and even gradations, rendering it highly decorative. In contrast, the point stitch technique employs well-blended colors and flat surfaces, often resembling traditional Chinese paintings. Therefore, the various stitching techniques are the artistic essence of embroidery, and mastering them is essential for beginners.
In her book "Shen Shou on Embroidery," Shen Shou, an accomplished embroidery artist during the late Qing Dynasty, mentioned the existence of 18 distinct stitches in Suzhou embroidery. In the post-1950s era, Suzhou embroidery artists classified their work into nine major categories, including plain or flat embroidery, striped embroidery, point embroidery, braided embroidery, netting embroidery, gauze embroidery, crisscross stitch embroidery, and variation embroidery.
Buy Chinese Silk Embroidery Online
1. Plain Stitch (Flat Stitch)
The plain stitch technique involves neatly arranging lines on the flat surface of the base material. The rise and fall of each stitch must align with the pattern's edge, ensuring proper spacing without overlaps or gaps. The edges should remain clean. This type of stitch is categorized into three forms based on the direction of the compositional lines: vertical, horizontal, and diagonal twining.
2. Back Stitch (Catch Stitch)
The back stitch, also known as the catch stitch, is a traditional Suzhou embroidery technique. It employs the plain stitch to connect layers of stitches, with each stitch penetrating the previous one. This results in even edges, neatly executed stitches, and well-defined color gradations. Embroideries created with this technique are ornamental. There are two variations of the back stitch: the face stitch and the reverse stitch.
Face stitch: This involves applying plain stitches in layers, starting from the outermost layer and moving inwards. The length of the lines depends on the pattern's size, typically ranging from 0.3 to 0.5 cm. The back stitch is then used to commence the second layer, connecting the stitches to the ends of the first layer's stitches. This technique yields clear and even layer endings, with color gradations transitioning from light to rich or vice versa.
3. Reverse Stitch
For small sections of embroidery, such as flower petals, multiple layers of equal width are created. A securing stitch is introduced from the second layer onwards to maintain the pattern's integrity. This involves starting the stitching at the mid-point of the next layer's side and forming an inverted "Y" shape with the horizontal line. Stitches are worked from the open base to the securing line, ensuring a taut arc. Subsequent layers follow this technique.
4. Flat Overlap Stitch
In this approach, a small section of embroidery is evenly divided into several layers, each measuring 1 or 2 cm. The first layer uses plain stitches to establish the edge, while the subsequent layers, termed "overlaps," have lines slightly longer than the edge lines. These overlap lines extend by six-tenths of the length of the edge stitches, and loose stitches align with the thickness of the lines. The third layer's line length matches that of the second layer. Each stitch inserted into the second layer's space should connect with the ends of the first layer's lines. This technique must maintain neat stitching, uniform line thickness, and consistent stitching direction.
5. Free Overlap Stitch
Free overlap stitch involves interlocking and overlapping layers, featuring stitching lines of varying lengths and irregular stitch placement. This naturally diverse arrangement of silk threads results in even color gradations, with slightly overlapped lines that conceal stitch marks. This technique is commonly used in modern decorative embroideries.
For instance, when embroidering a flower petal, the process begins with a neatly edged outer layer and irregular inner lines. The differences in these irregular lines should be around two to three-tenths of the line's length, not exceeding half the line's length. Stitches should be flat, neat, even, and tight. Subsequent layers introduce irregularly spaced lines of equal length, with overlapping designed to cover eight-tenths of the previous layer's lines. Stitches are slightly loose, with one stitch separating them. Lines in the third layer are inlaid between the second layer's lines and then inserted into the first layer to conceal stitch marks, making toning and fitting easier.
6. Long-and-short Stitch
Long-and-short stitch closely resembles the free overlap stitch, but with visible stitch marks. It is primarily used for embroidering flowers, plant stems, tree trunks, and rocks. The first layer features neatly arranged long and short lines along the edge. In subsequent layers, stitches of equal length are inserted into the spaces of the previous layer. This layer-by-layer connection yields a flat, thin surface with visible stitches, offering greater flexibility in line composition and color gradation.
7. Shi-stitch
The term "shi" implies adding another stitch above previous ones without overlapping layers. When embroidering the first layer of lines, stitches should be loose. The space between two adjacent stitches depends on the shading's complexity, typically spanning two stitches. This technique requires layer-by-layer embroidery to achieve color gradations.
8. Braiding Stitch
Braiding stitch, also known as the lock stitch, is one of the earliest embroidery techniques, with a history spanning over 3,000 years. It is beginner-friendly, requiring even stitches. Designs executed with this stitch are durable, making it a common choice for everyday items' embellishment.
To create braiding stitch embroidery, start the first stitch from the pattern's edge, with the needle descending near the stitch's base. As the needle descends, the thread forms a loop. The second stitch is positioned at the loop's center, immediately pulling the first loop tight. Subsequent stitches follow this pattern, with uniform rising and falling stitches and bold lines.
9. Stem Stitch
Stem stitch serves to connect each stitch to the previous one. It results in a relatively bold stitching line with short individual stitches. Begin by making the first 1mm stitch at one end of the design. The second stitch is inserted into the first stitch hole, ensuring that each stitch connects with the last, creating a bead-like stitch appearance. The luster of silk threads lends these stitches a crystal bead-like quality, making them particularly decorative.
10. Connecting Stitch
Connecting stitch serves to link two stitches. Commence work by creating the first stitch at one end of the design, followed by short stitches of equal length (approximately 3-6mm). Each stitch should connect to the previous one. Insert the subsequent stitch into the middle of the prior one, ensuring that all stitches form a single straight line.
11. Roll Stitch
Roll stitch involves placing two stitches close together without connecting them but instead inserting them in the middle of the previous stitch. Silk threads naturally twist in roll stitch embroidery, making it ideal for working on curved elements. To execute roll stitch, start with the first 3mm stitch at one end of the design. The second stitch is positioned 1.5mm from the first stitch, falling at the midpoint of the first stitch and measuring 3mm in length. The needle should be inserted into the middle of the line to conceal the stitch mark. The third stitch also falls at the midpoint of the second stitch, immediately connecting to the end of the first stitch. Subsequent stitches follow this pattern.
12. Flat Golden Stitch
Flat golden stitch involves the incorporation of gold-colored or silk threads throughout the design, resulting in a stunning effect. To begin, gold-colored threads are wound around a spool to create a double thread. To commence embroidery, a short needle threaded with silk is used to secure the gold thread through the initial stitch hole, concealing it on the backside. The thread is then spread from the edge according to the design, with stitches made approximately every three millimeters. Stitches should be placed in the spaces between lines, forming patterns such as osmanthus flowers.
13. Coiled Gold Thread Stitch
Coiled gold thread stitch is similar to flat golden stitch but utilizes gold thread solely for decorative outlines. The technique closely resembles that of flat golden stitch, with gold thread used to create ornamental accents in silk embroidered designs.
14. Twisted Knot Stitch
Twisted knot stitch is one of the traditional stitches in Suzhou embroidery. It forms small knobby loops on the embroidered surface, with each stitch featuring a knot. This technique is primarily used for decorative designs. When working, begin by using the needle to pull the thread out of the embroidered surface. Insert the needle at a point approximately 1mm from the original stitch hole, then tighten the thread to create a knot on the surface.
15. Net Stitch
Net stitch is an embroidery technique that employs vertical, horizontal, and diagonal lines to intersect and create openwork patterns within the embroidery. This technique is highly versatile and can be used to produce various designs. For example, when embroidering a simple triangle, begin by using horizontal and diagonal lines to establish the triangle's framework. Short stitches are then applied at each intersection point to prevent the long thread from becoming loose. To complete the pattern, start with the first stitch, with the needle rising at one angle and descending at any of the other angles. Subsequently, create stitches from the central point of the triangle, passing through the line of the preceding stitch and inserting the needle at the opposite angle. This process yields intricate patterns within the triangle, and a collection of triangles can be combined to form beautiful designs.
16. Tie Stitch
Tie stitch is a decorative embroidery technique commonly used in conjunction with plain or flat stitch in plain embroidery. It is typically employed to embroider details such as bird claws, litchi shells, and more. For instance, when embroidering a bird's claw, flat stitch is used to outline the claw's shape, while tie stitch is used to create the stripes on the claw. To execute tie stitch, start by creating a diagonal stitch of the same width as the stripe in the design. Then, use a spot stitch to pull the diagonal stitch into a pointed angle. This process continues for the remaining stripes on the claw.
17. Scale Stitch
Scale stitch is employed to embroider bird feathers and fish scales and is added to completed embroidery pieces in conjunction with plain or flat stitches. To create scale stitch, initiate the process at the neck of the bird, establishing a horizontal stitch across the width of the scale pattern. Use a short stitch to draw the horizontal line into a triangle, and continue with symmetrical short tie stitches at uniform intervals to form the scale. Repeat this pattern to complete the scales on the bird or fish.
18. Crisscross Stitch
Crisscross stitch represents an innovative embroidery technique pioneered by Suzhou embroidery artists. In this approach, stitches and colors are applied freely and flexibly, allowing for greater creative freedom. Artists can blend different colored silk threads or use threads with mixed colors, working layer by layer to emphasize the colors of the embroidery. Crisscrossed lines are used to create captivating images on the embroidery piece. Crisscross stitch embroidery is renowned for its flowing lines and rich colors, with many patterns drawing inspiration from sources like oil paintings, photographs, and sketches. This technique adds a new dimension to the world of embroidery, enabling artists to weave intricate and captivating imagery.
Custom Portrait Embroidery from Photo
In conclusion, Suzhou embroidery is a rich and intricate art form that encompasses a wide range of stitching techniques, each with its own characteristics and applications. From the traditional stitches like plain and back stitches to more modern and creative approaches like crisscross stitch, Suzhou embroidery offers endless possibilities for artistic expression. Whether used for traditional designs or contemporary works of art, these stitching techniques continue to captivate and inspire embroidery enthusiasts around the world.
by Su Embroidery Studio (SES), Suzhou China
SES is dedicated to Chinese Silk Embroidery Art and High-End Custom Embroidery
Find SES's embroidery work at Chinese Silk Embroidery for Sale.


